
📅 Budget Planner
Monthly advertising planner that distributes budget top-down across brands, categories, and subcategories — with SOV and ROAS targets, pacing rules, and live performance tracking.
Overview
Budget Planner is Reviniti's monthly advertising planning tool. It lets you define a total monthly budget and distribute it top-down across brands, categories, and subcategories — with per-entity performance targets (SOV, ROAS), pacing rules, and keyword/ad-type intent — through a single guided wizard. Once activated, the plan becomes your source of truth for in-month spend, and the landing screen switches to a live performance monitor tracking actuals against your targets.
Planning follows a strict waterfall: Total Budget → Brands → Categories → Subcategories. Pacing and intent rules apply globally, with optional entity-level exceptions. AutoSet uses last month's spend and weighted sales data to pre-fill allocations at any level, and every field remains editable after AutoSet is applied.
📌 Heads up - Performance Overview is now Campaign Manager. The pager where campaigns, keywords and other campaign attributes live has been renamed from Performance Overview to Campaign Manager. All functionality is unchanged - only the name and navigation label have been updated
Page Layout
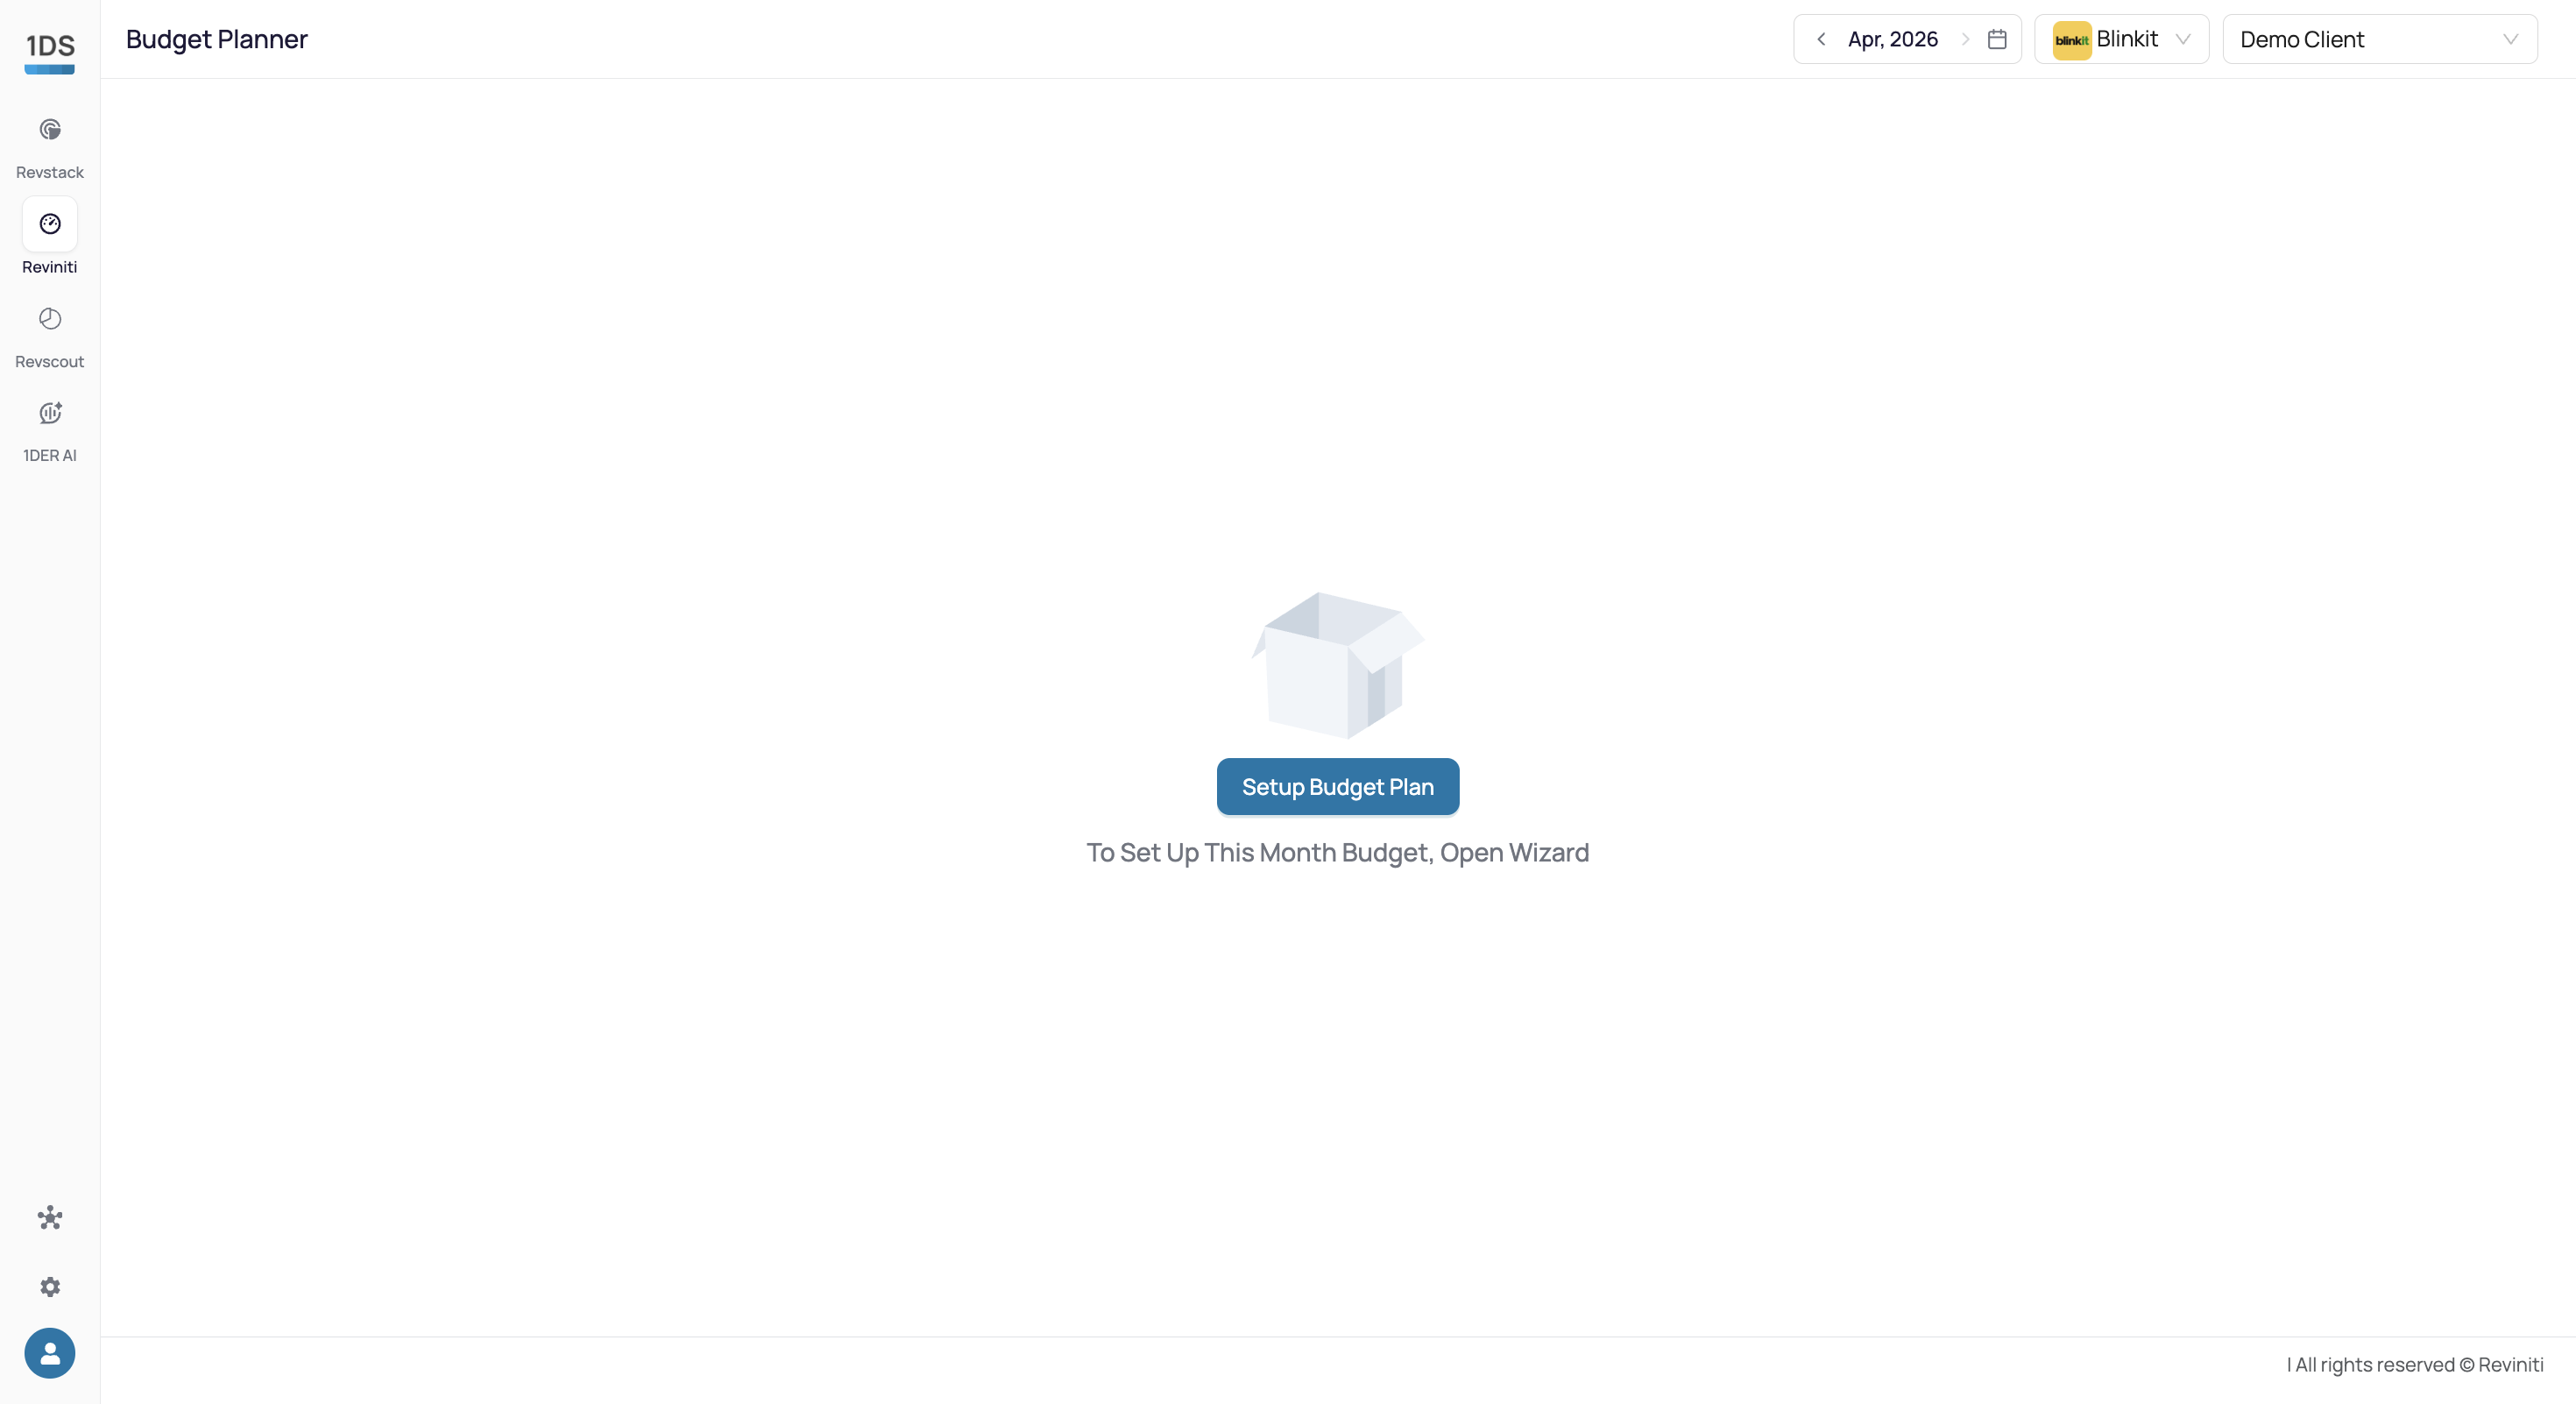
The Budget Planner page is a single scrollable view. Before a plan is confirmed, it shows an empty landing state with a single CTA to open the wizard. Once confirmed, the page switches to a live performance monitor — cumulative spend vs. ideal pacing curve, SOV and ROAS target vs. actual, and brand-level performance breakdowns.
The page includes the following controls:
- Financial year selector - Switch between FY 2025-26, FY 2026-27, etc.
- Month selector - Set the planning month; Budget Planner supports one month at a time
- Open Wizard - Launch or re-enter the wizard to edit the current month's plan
- Auto Manage toggles - Enable or disable automated execution of 1der Recommendations per brand, category, or subcategory
- Edit in Wizard - Jump directly to a specific wizard step from any brand or pacing rule row
ℹ️ Budget planning is always for the current month. There is no multi-month planning view — each month is planned, confirmed and monitored independently
Wizard Steps
The wizard is a six-step flow that takes you from a total monthly budget down to fully paced, intent-configured allocations. Each step is independently validated — you cannot advance until the current step balances.
🚧 Heads up
Some features and functionalities described on this page are still rolling out. If you don't see something in the UI yet, it's on the way - stay tuned.
Step 1: Monthly Budget
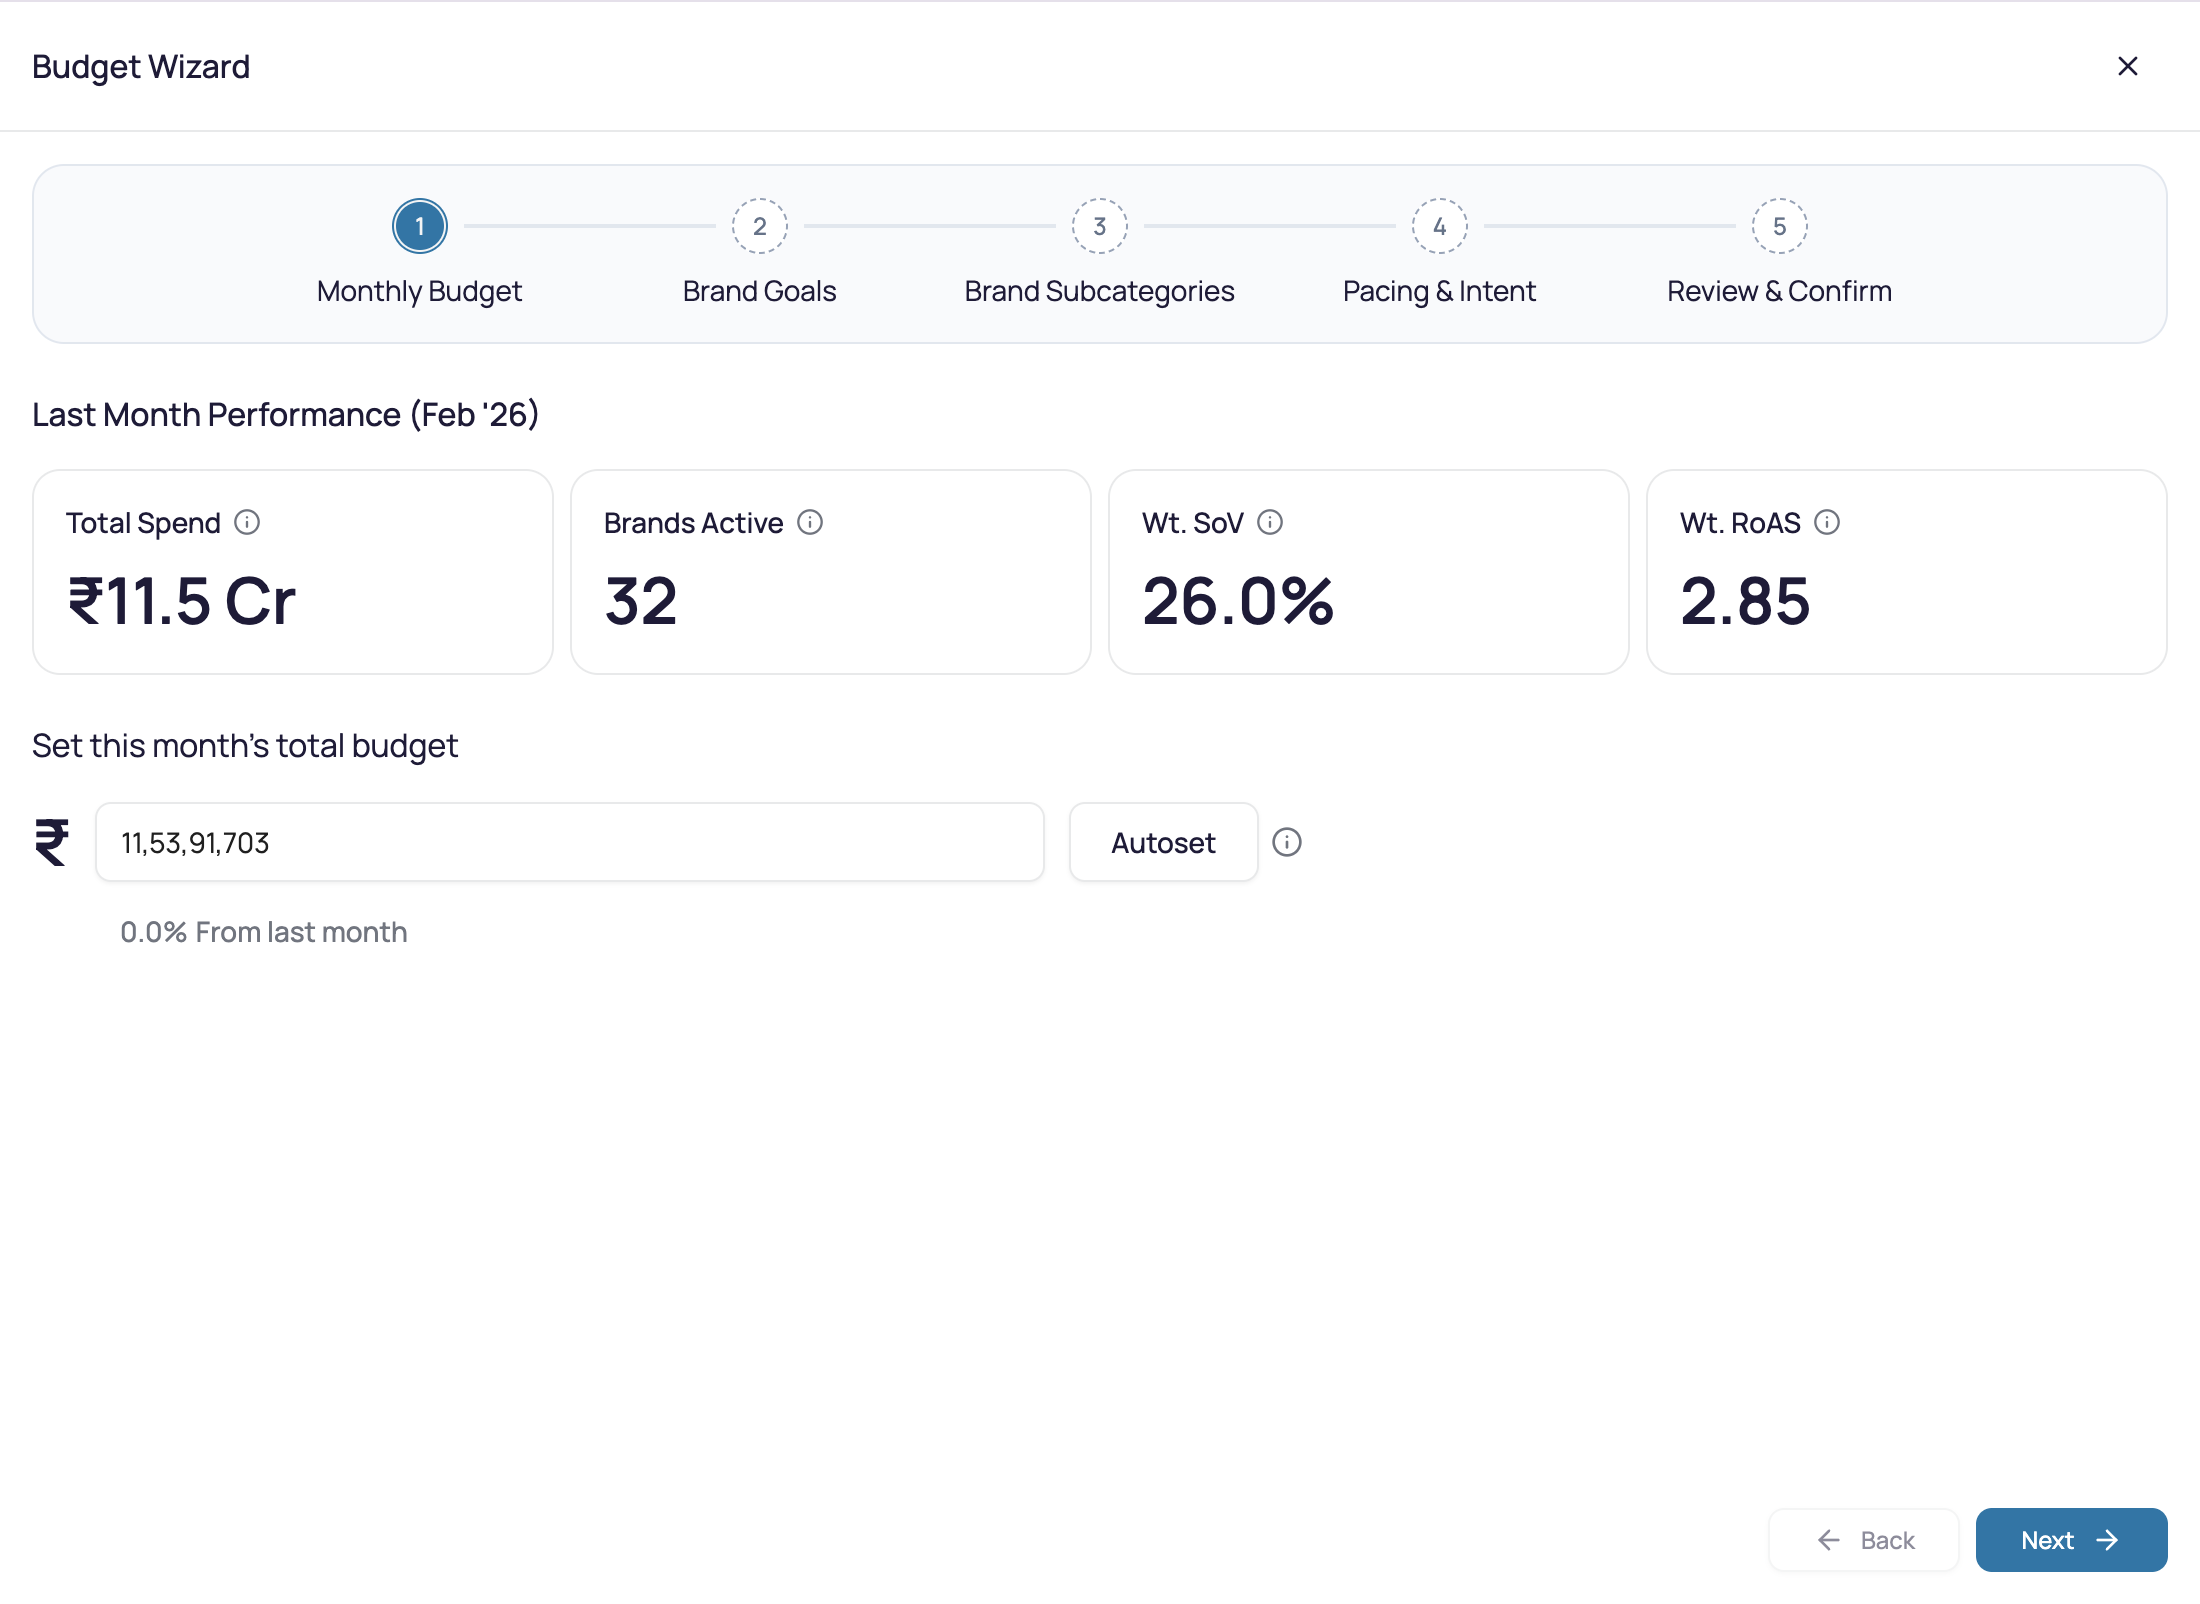
Set the total advertising budget for the month. This is the ceiling that everything downstream rolls up to.
You have two options:
- Enter manually - Type in a custom total based on your plan for the month
- AutoSet - The system pre-fills last month's total spend as the starting value
Last Month Performance — total spend, SOV, and ROAS — is shown alongside the input so you can benchmark your planned budget against actuals.
Step 2: Brand Goals
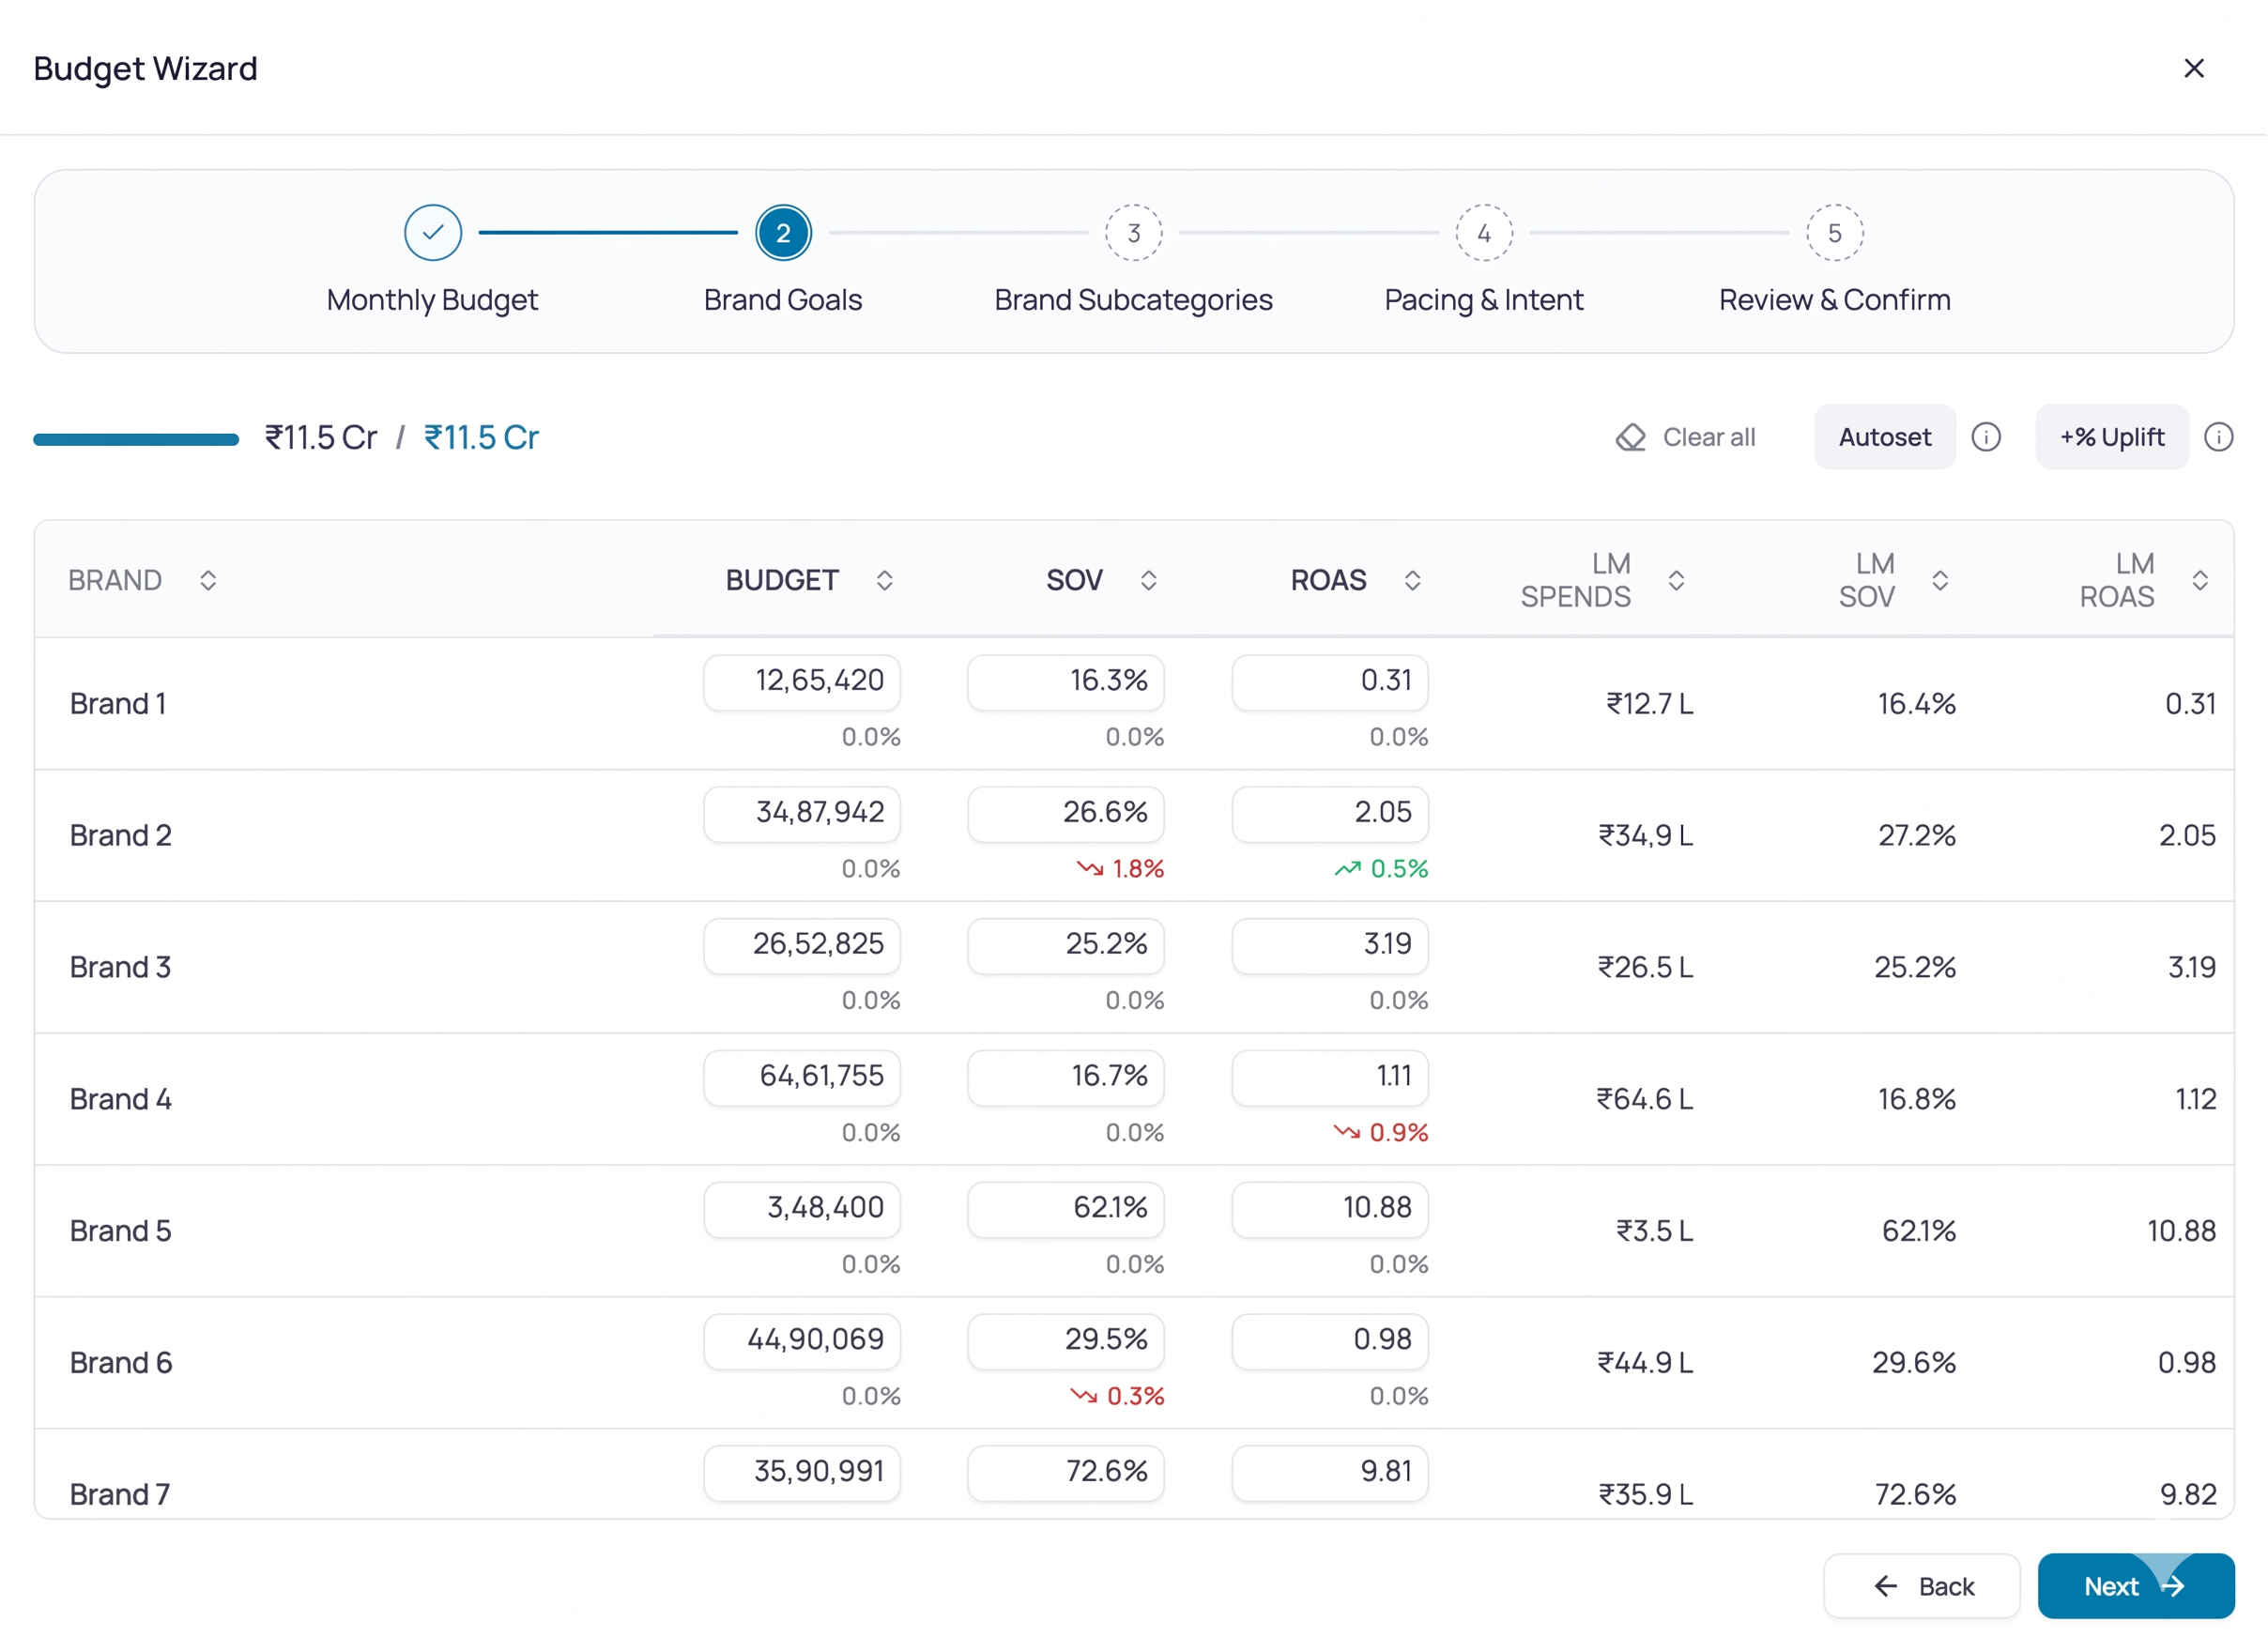
Distribute the monthly budget across your brands and set performance targets for each.
For every brand, define:
- Budget - How much of the total monthly budget this brand should receive
- SOV - Your Share of Voice target for the brand
- ROAS - Your Return on Ad Spend target for the brand
Last month's brand-level performance is displayed inline so you can benchmark targets against actuals.
Two ways to populate:
- Enter manually - Full control over the split; type each brand's budget and targets directly
- AutoSet - Distributes the budget proportionally using
last month spend × sales weight, summing exactly to the total from Step 1
All fields remain editable after AutoSet — adjust any number and the waterfall recalculates live. The step is valid only when brand budgets sum exactly to the monthly total.
Step 3: Categories & Subcategories
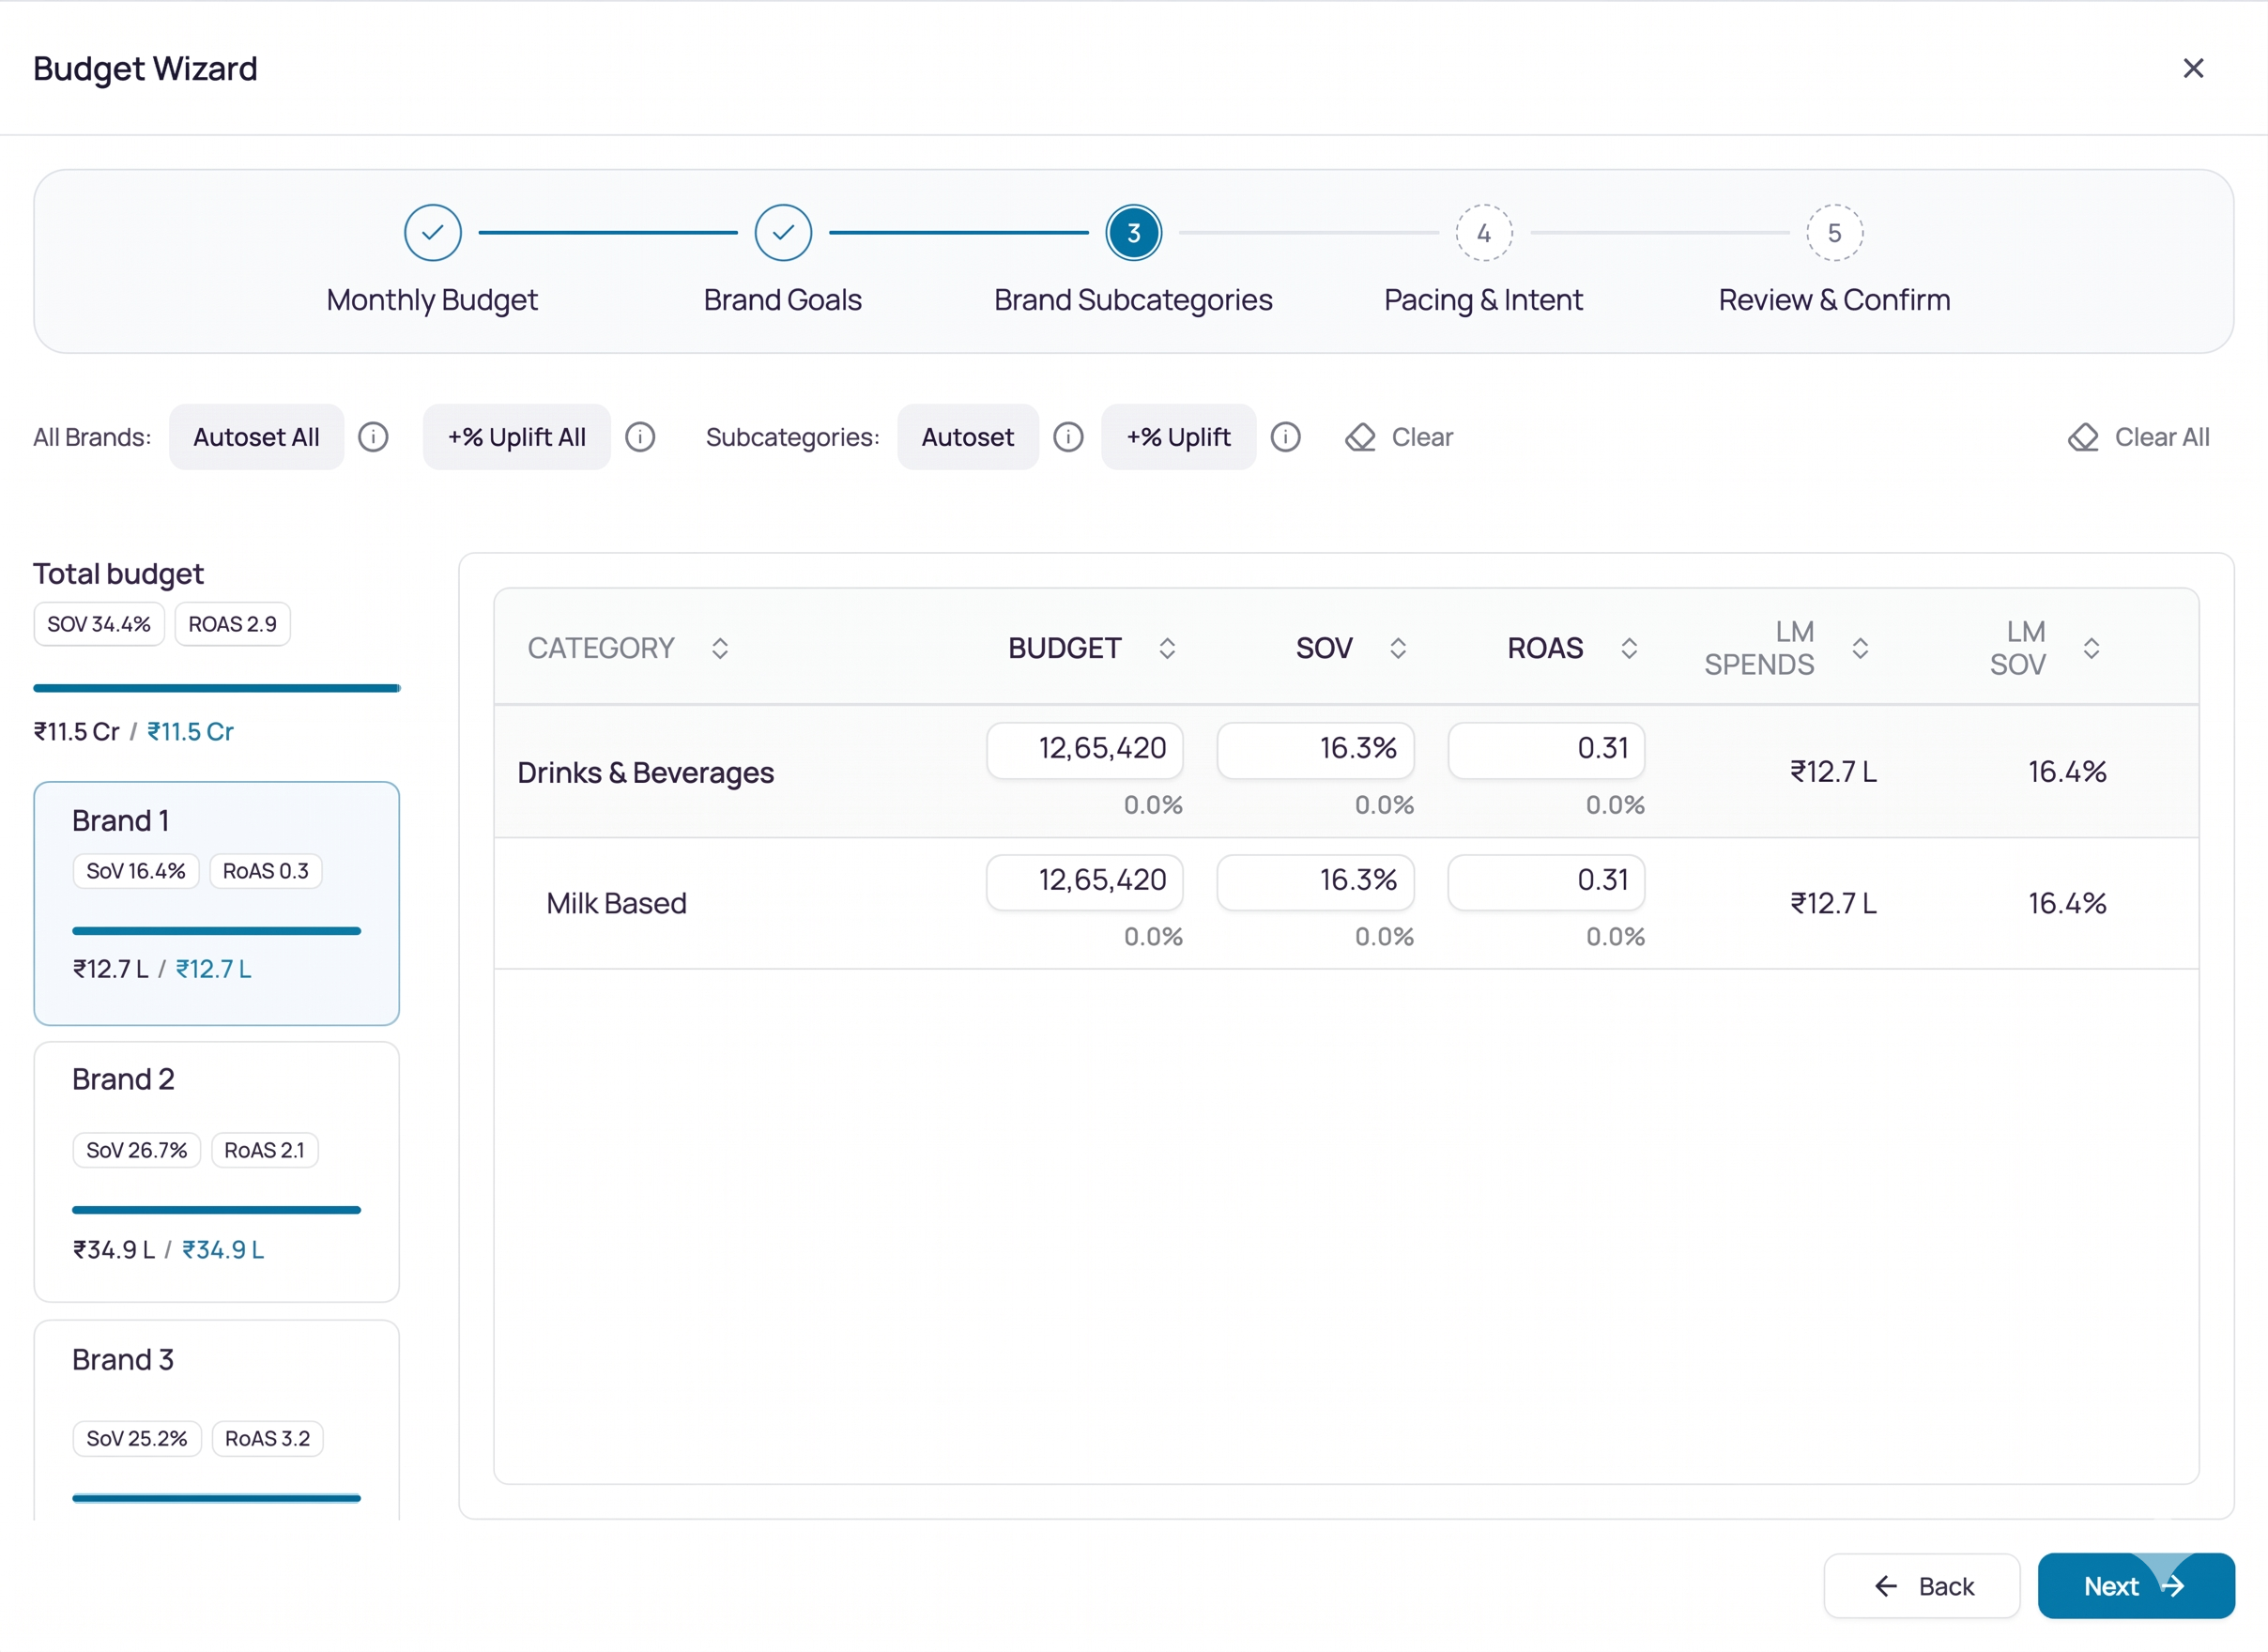
Break each brand's budget down into categories and subcategories for more precise planning.
| Allocation Level | What it Controls |
|---|---|
| Category | Broad product groupings under a brand. Budget allocated here must sum to the parent brand's budget |
| Subcategory | More specific segments within each category. Budget must sum to the parent category's budget |
Three ways to populate:
- Enter manually - Define category and subcategory splits directly for full control
- Global AutoSet - Populates the entire brand → category → subcategory tree using last month's performance in one action
- Level-based AutoSet - Populates values at a single level only (e.g., just categories under one brand), leaving other branches untouched
Manual edits always override AutoSet values. Unallocated or over-allocated branches are flagged with amber warnings before you can proceed.
Step 4: Pacing & Intent
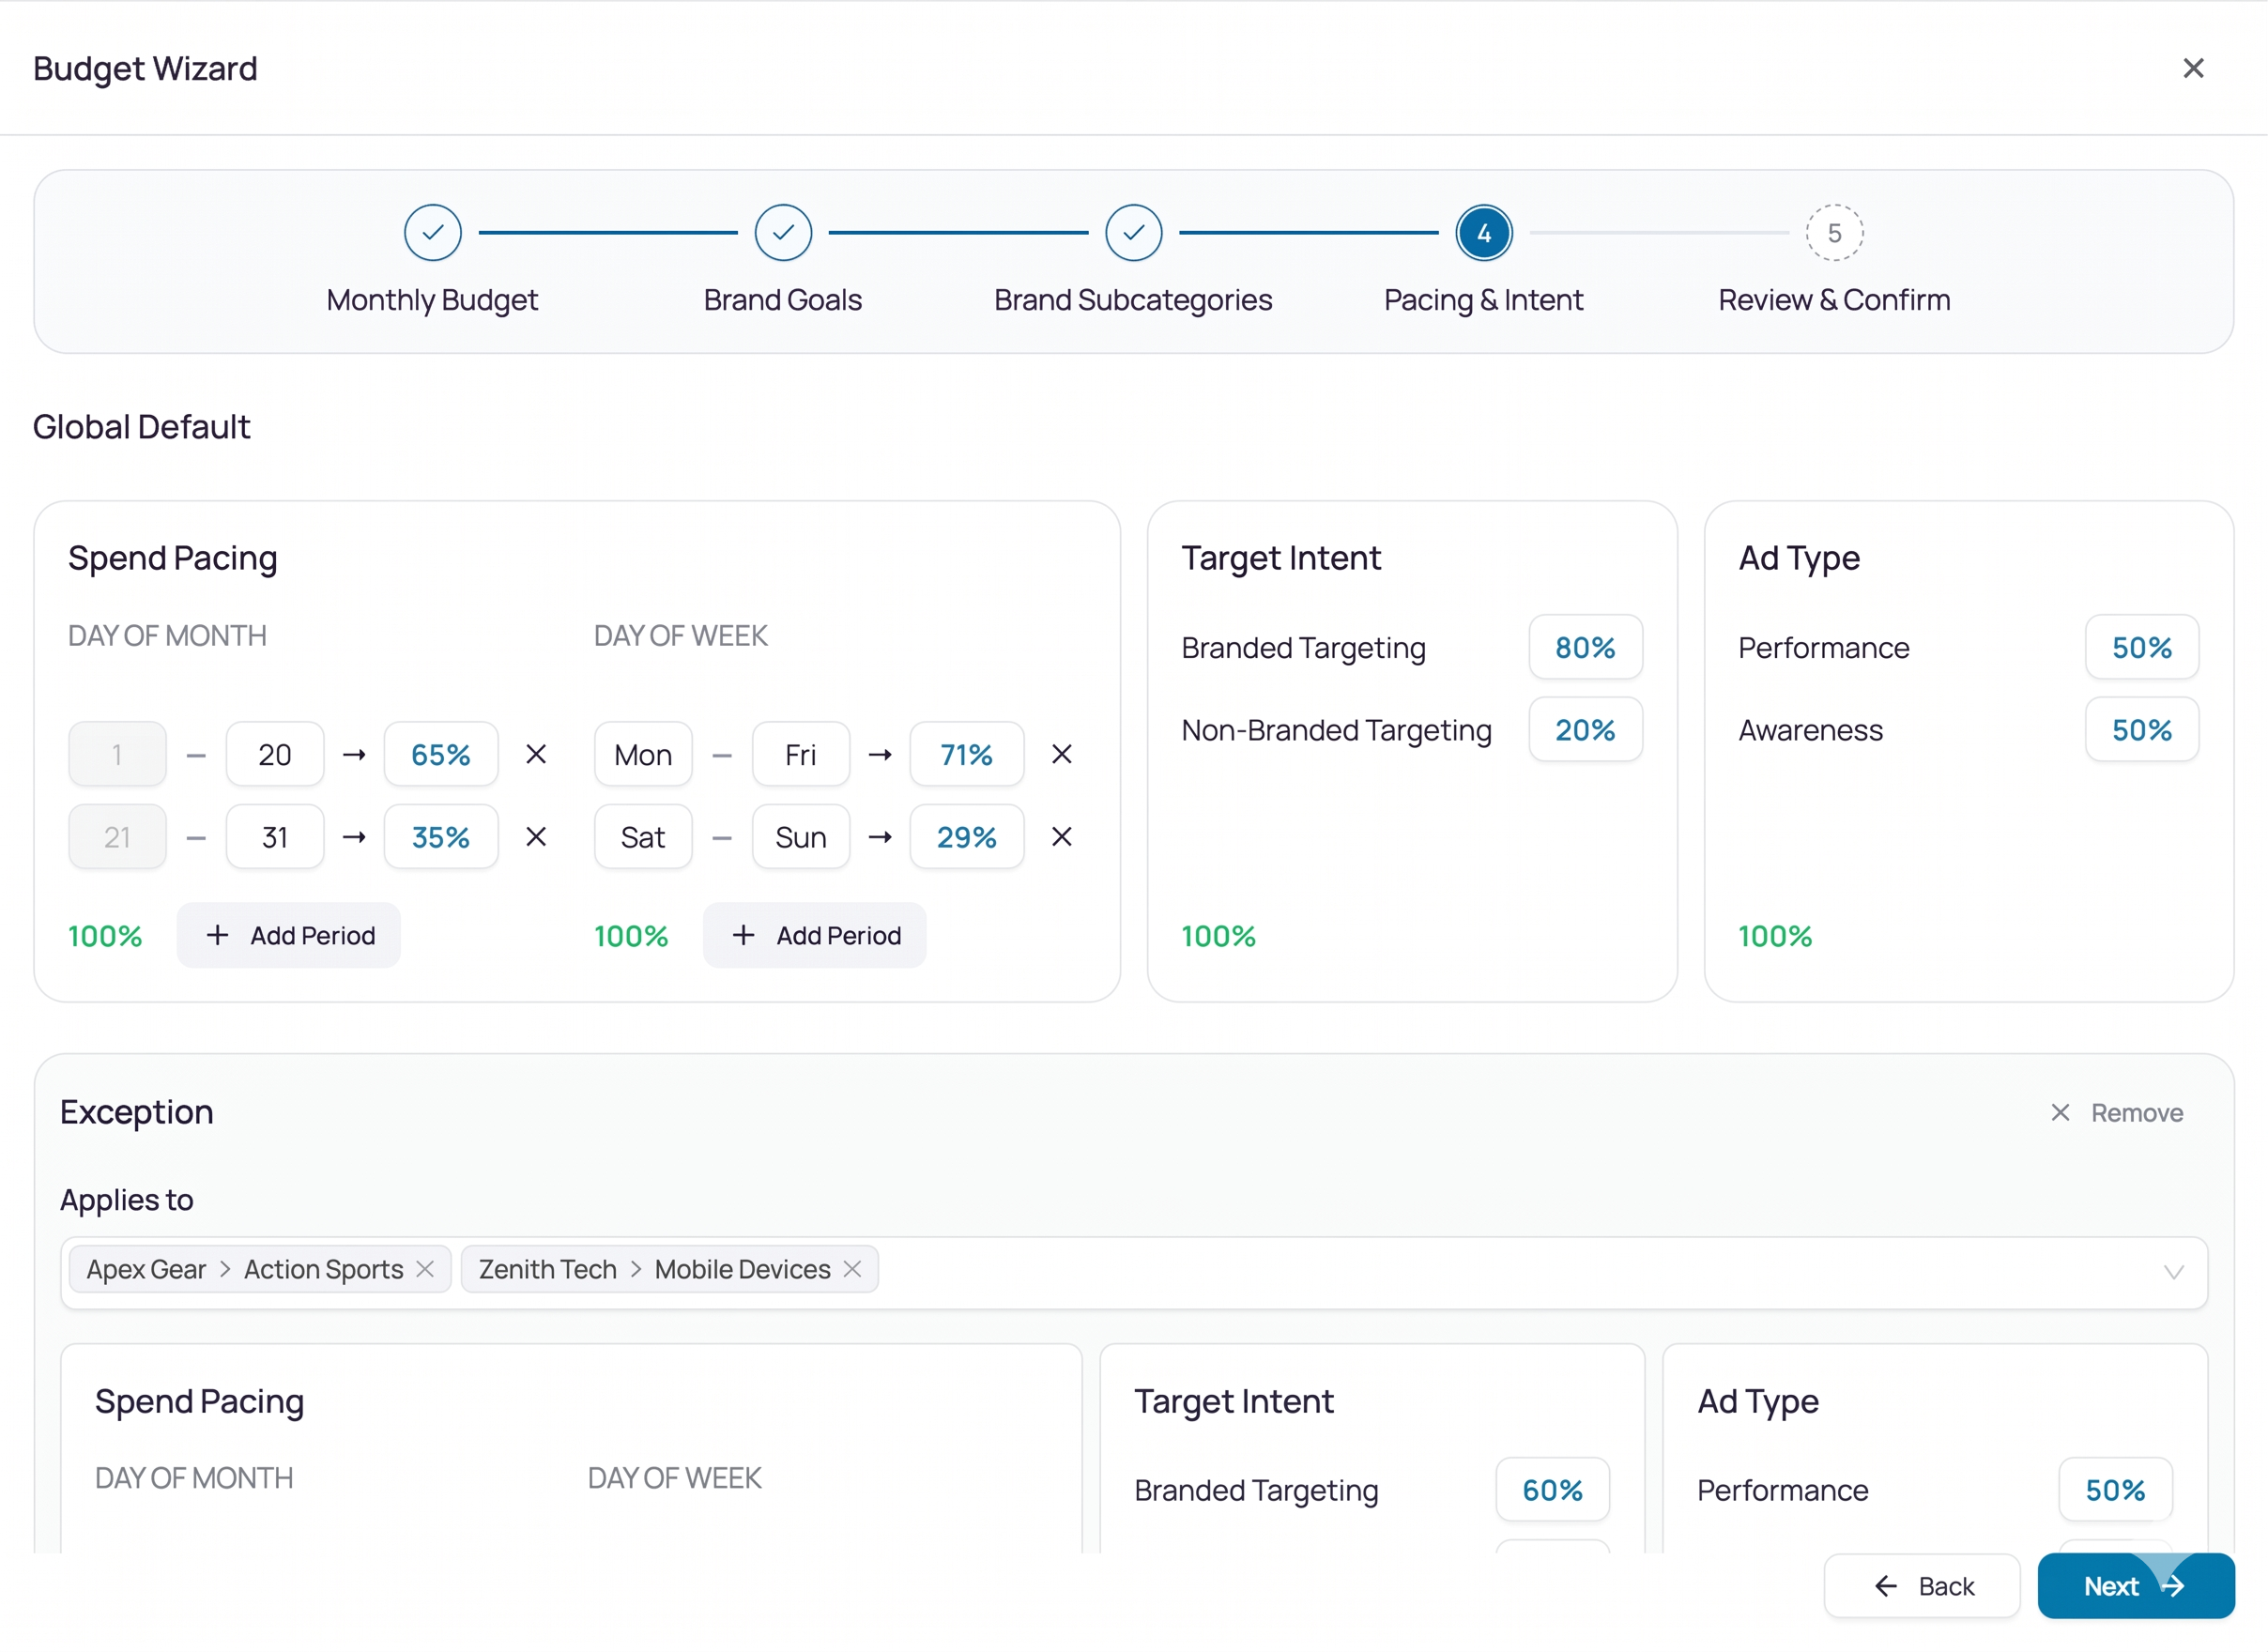
This step controls how your budget is spent — not how much. What you configure here becomes the Global Default and applies to every brand, category, and subcategory unless you override it in Step 5.
| Pacing Dimension | What it Controls |
|---|---|
| Day of Month | Splits monthly budget across specific date ranges (e.g., 50 % for Day 1 - 15, 50% for Day 16 - 30). Ranges must cover the full month and sum to 100% |
| Day of Week | Splits spends across weekday groupings (e.g., 50% for Mon - Thu, 50% for Fri - Sun). All 7 days must be covered with no duplicates, and must sum to 100% |
| Keyword Intent | Divides spend between Branded keywords (queries containing your brand name) and Generic keywords (category or product-type queries). Must sum to 100% |
| Ad Type | Divides spend between Performance (conversion focused) and Reach (awareness and discovery) ad formats. Must sum to 100% |
ℹ️ Each dimension must independently sum to 100%. Pacing controls the distribution and timing of spend, not the total amount.
Step 5: Exceptions (Optional)
If a specific brand, category, or subcategory needs a different pacing or intent configuration than the Global Default, add an Exception rule here.
For each Exception:
- Select the entity to override — Brand, Category, or Subcategory (multi-select supported)
- Redefine any of Day of Month, Day of Week, Keyword Intent, or Ad Type for the selected entities
The Exception rule applies only to the selected entities; all other entities continue to use the Global Default. You can add multiple Exception rules for different entities.
Step 6: Review & Confirm
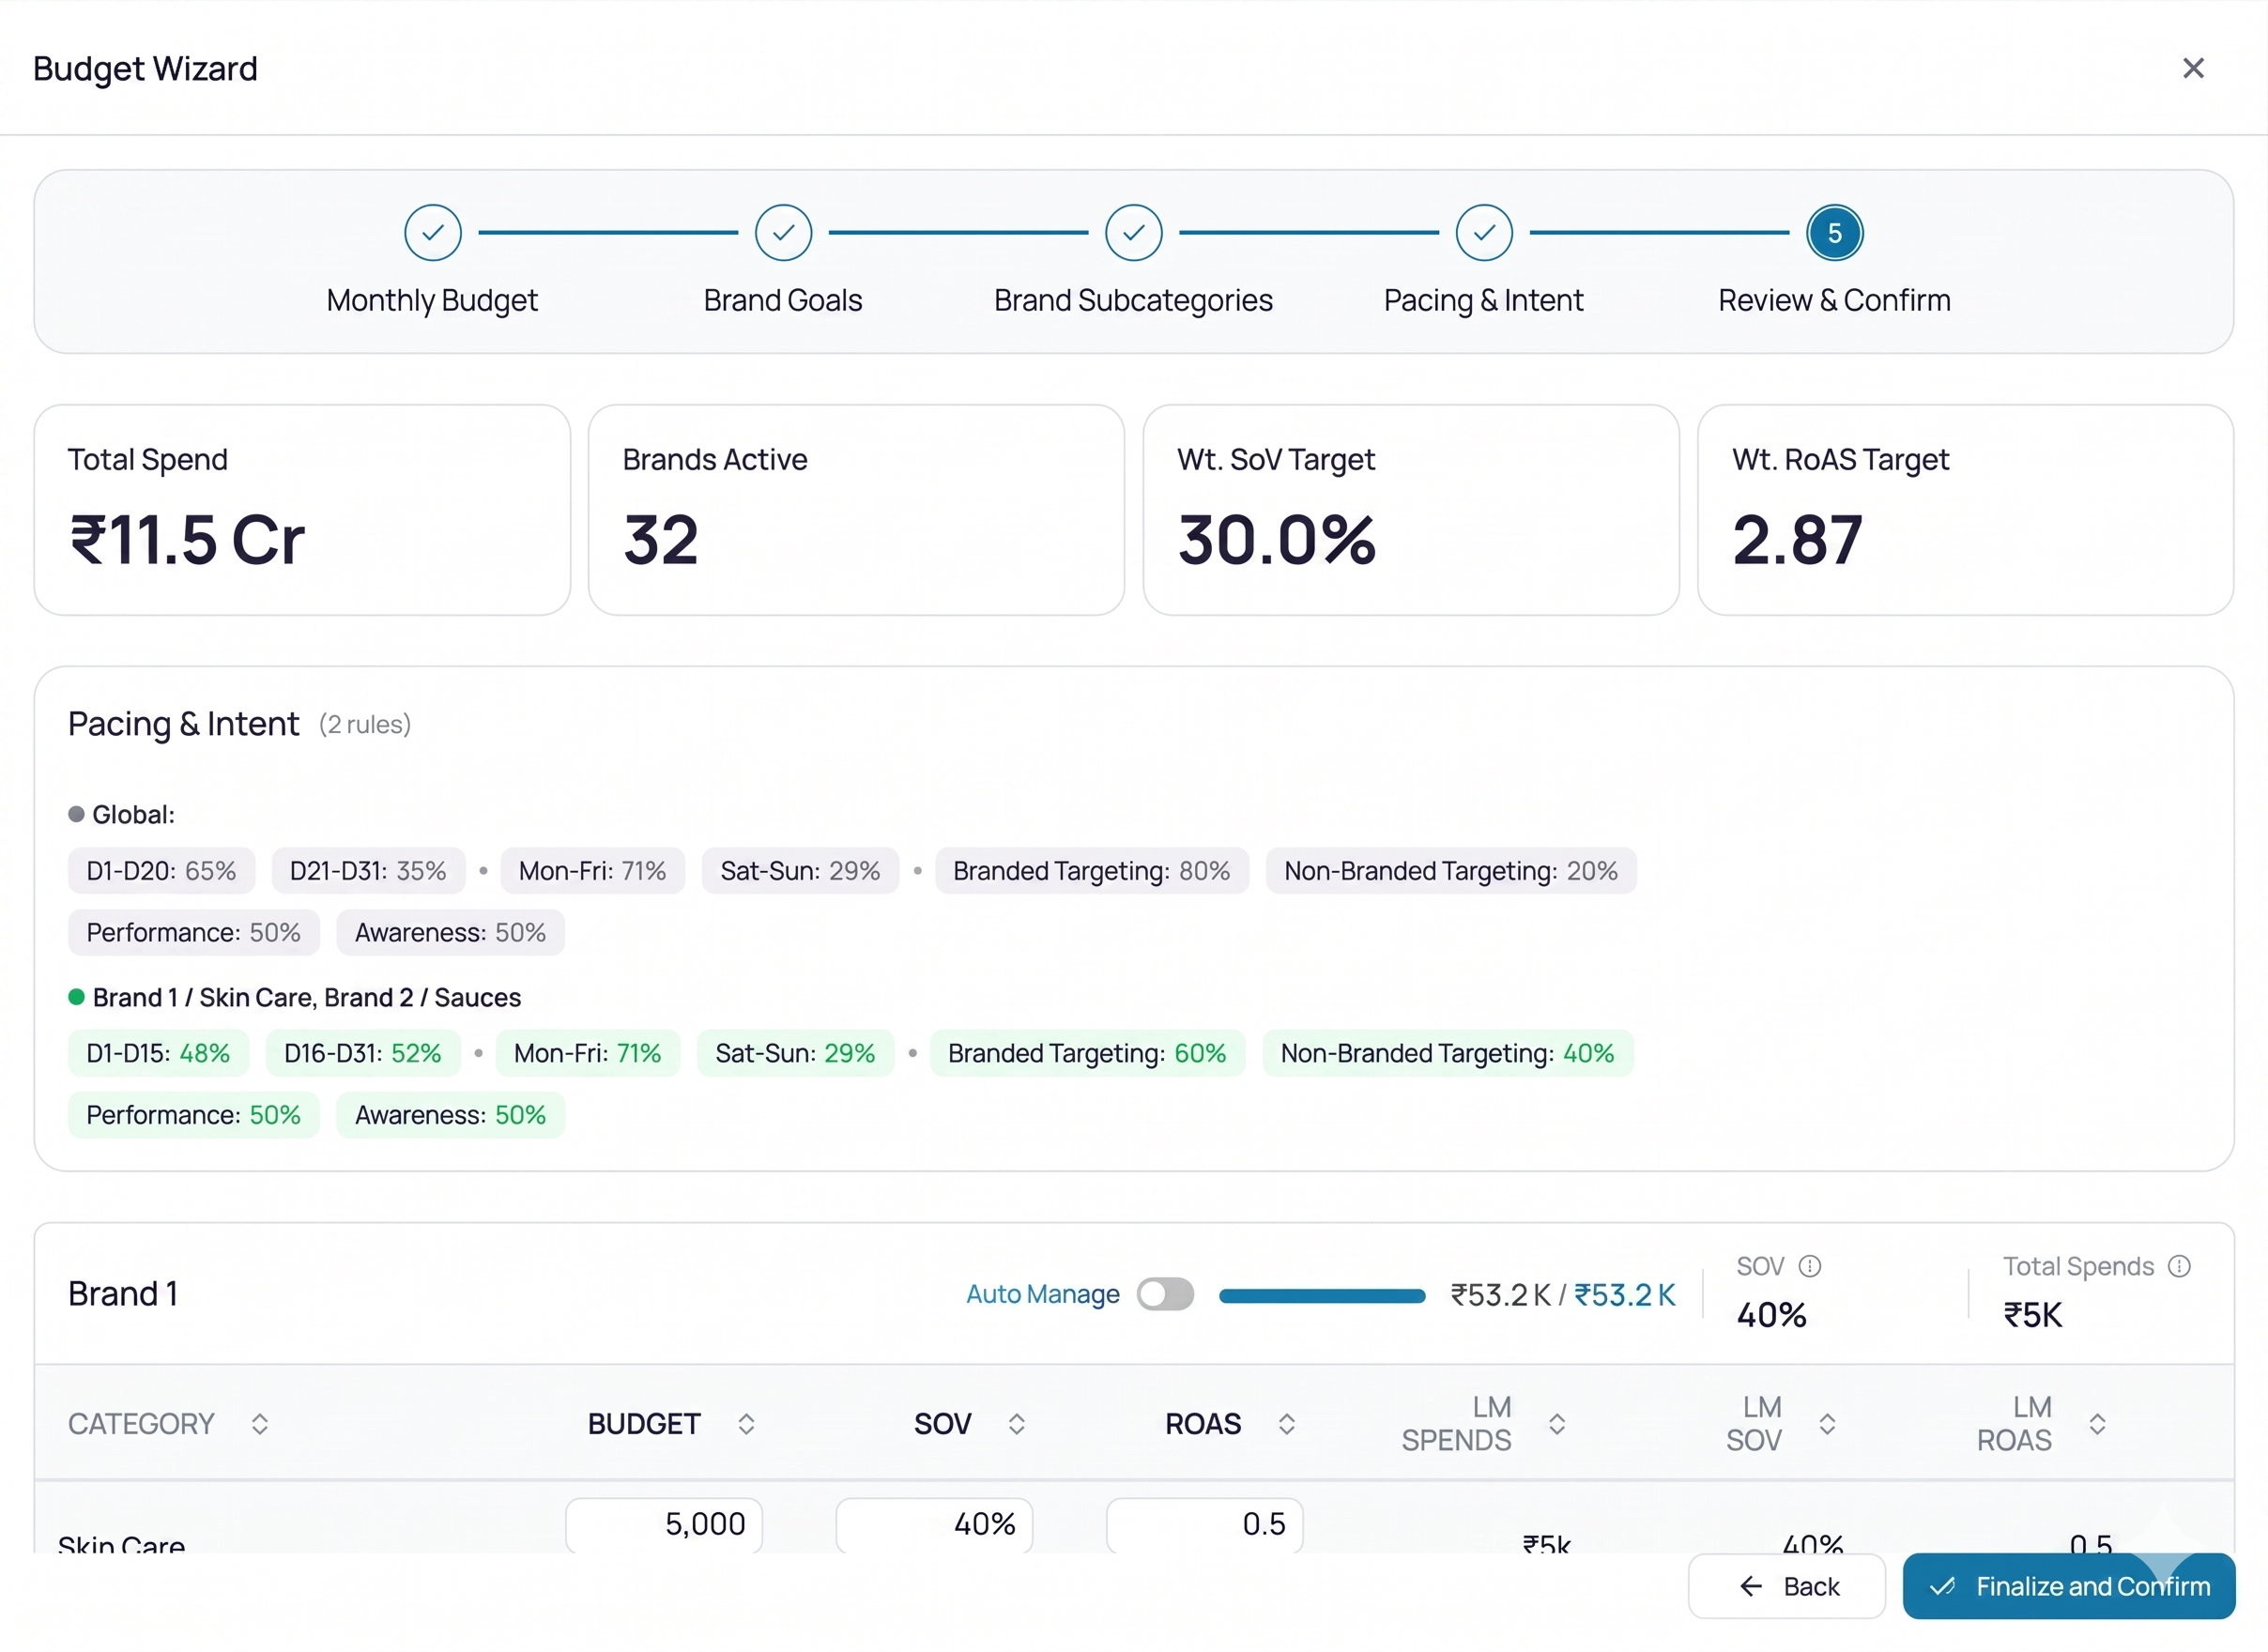
A consolidated view of everything configured — your final checkpoint before the plan goes live.
The review screen shows:
- Total budget and its full allocation across brands, categories, and subcategories
- SOV and ROAS targets per brand
- Global Default pacing and intent configuration
- All active Exception rules
- Warnings for any unbalanced branches or incomplete configuration
If something looks off, jump back to the relevant step, make your changes, and return to Review. Selections are retained throughout — nothing is lost. Once everything checks out, click Confirm to activate the plan.
Wizard Actions
a. AutoSet
AutoSet populates allocations using last month spend × sales weight as the distribution formula, ensuring the result sums exactly to the parent total. It is available at every level of the waterfall — total budget, brand, category, and subcategory — and can be triggered globally or per-level. AutoSet never locks a value; every field remains editable afterwards.
b. Uplift
|
|
Uplift applies a percentage increase (or decrease) on top of last month's spend as the planning base. Use it when you want to scale the prior month's allocations rather than re-derive from weighted sales — for example, "plan at +15% of last month across the board." Uplift can be applied at the monthly total or per-brand level. |
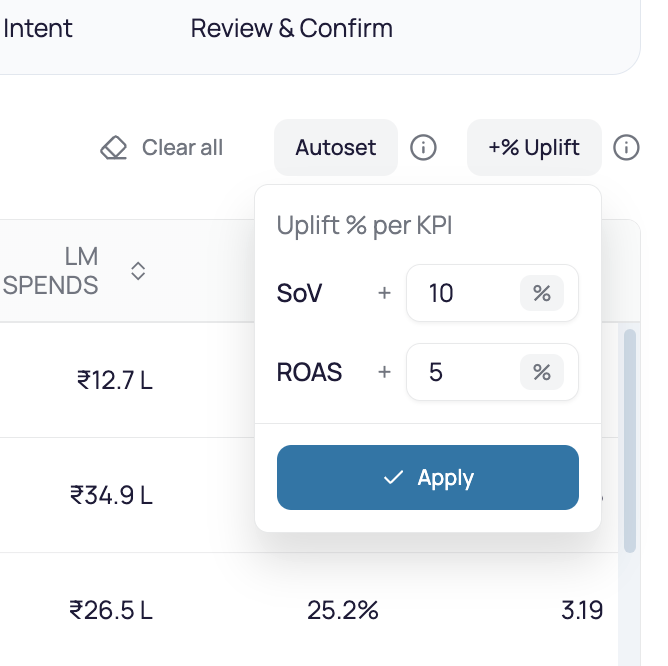
c. Confirm & Activate
Once you click Confirm on Step 6, the plan is locked in and the landing page switches to the performance monitor view. You can still re-open the wizard to edit the plan mid-month — changes take effect immediately and the monitor updates in real time.
Auto Manage (1der)
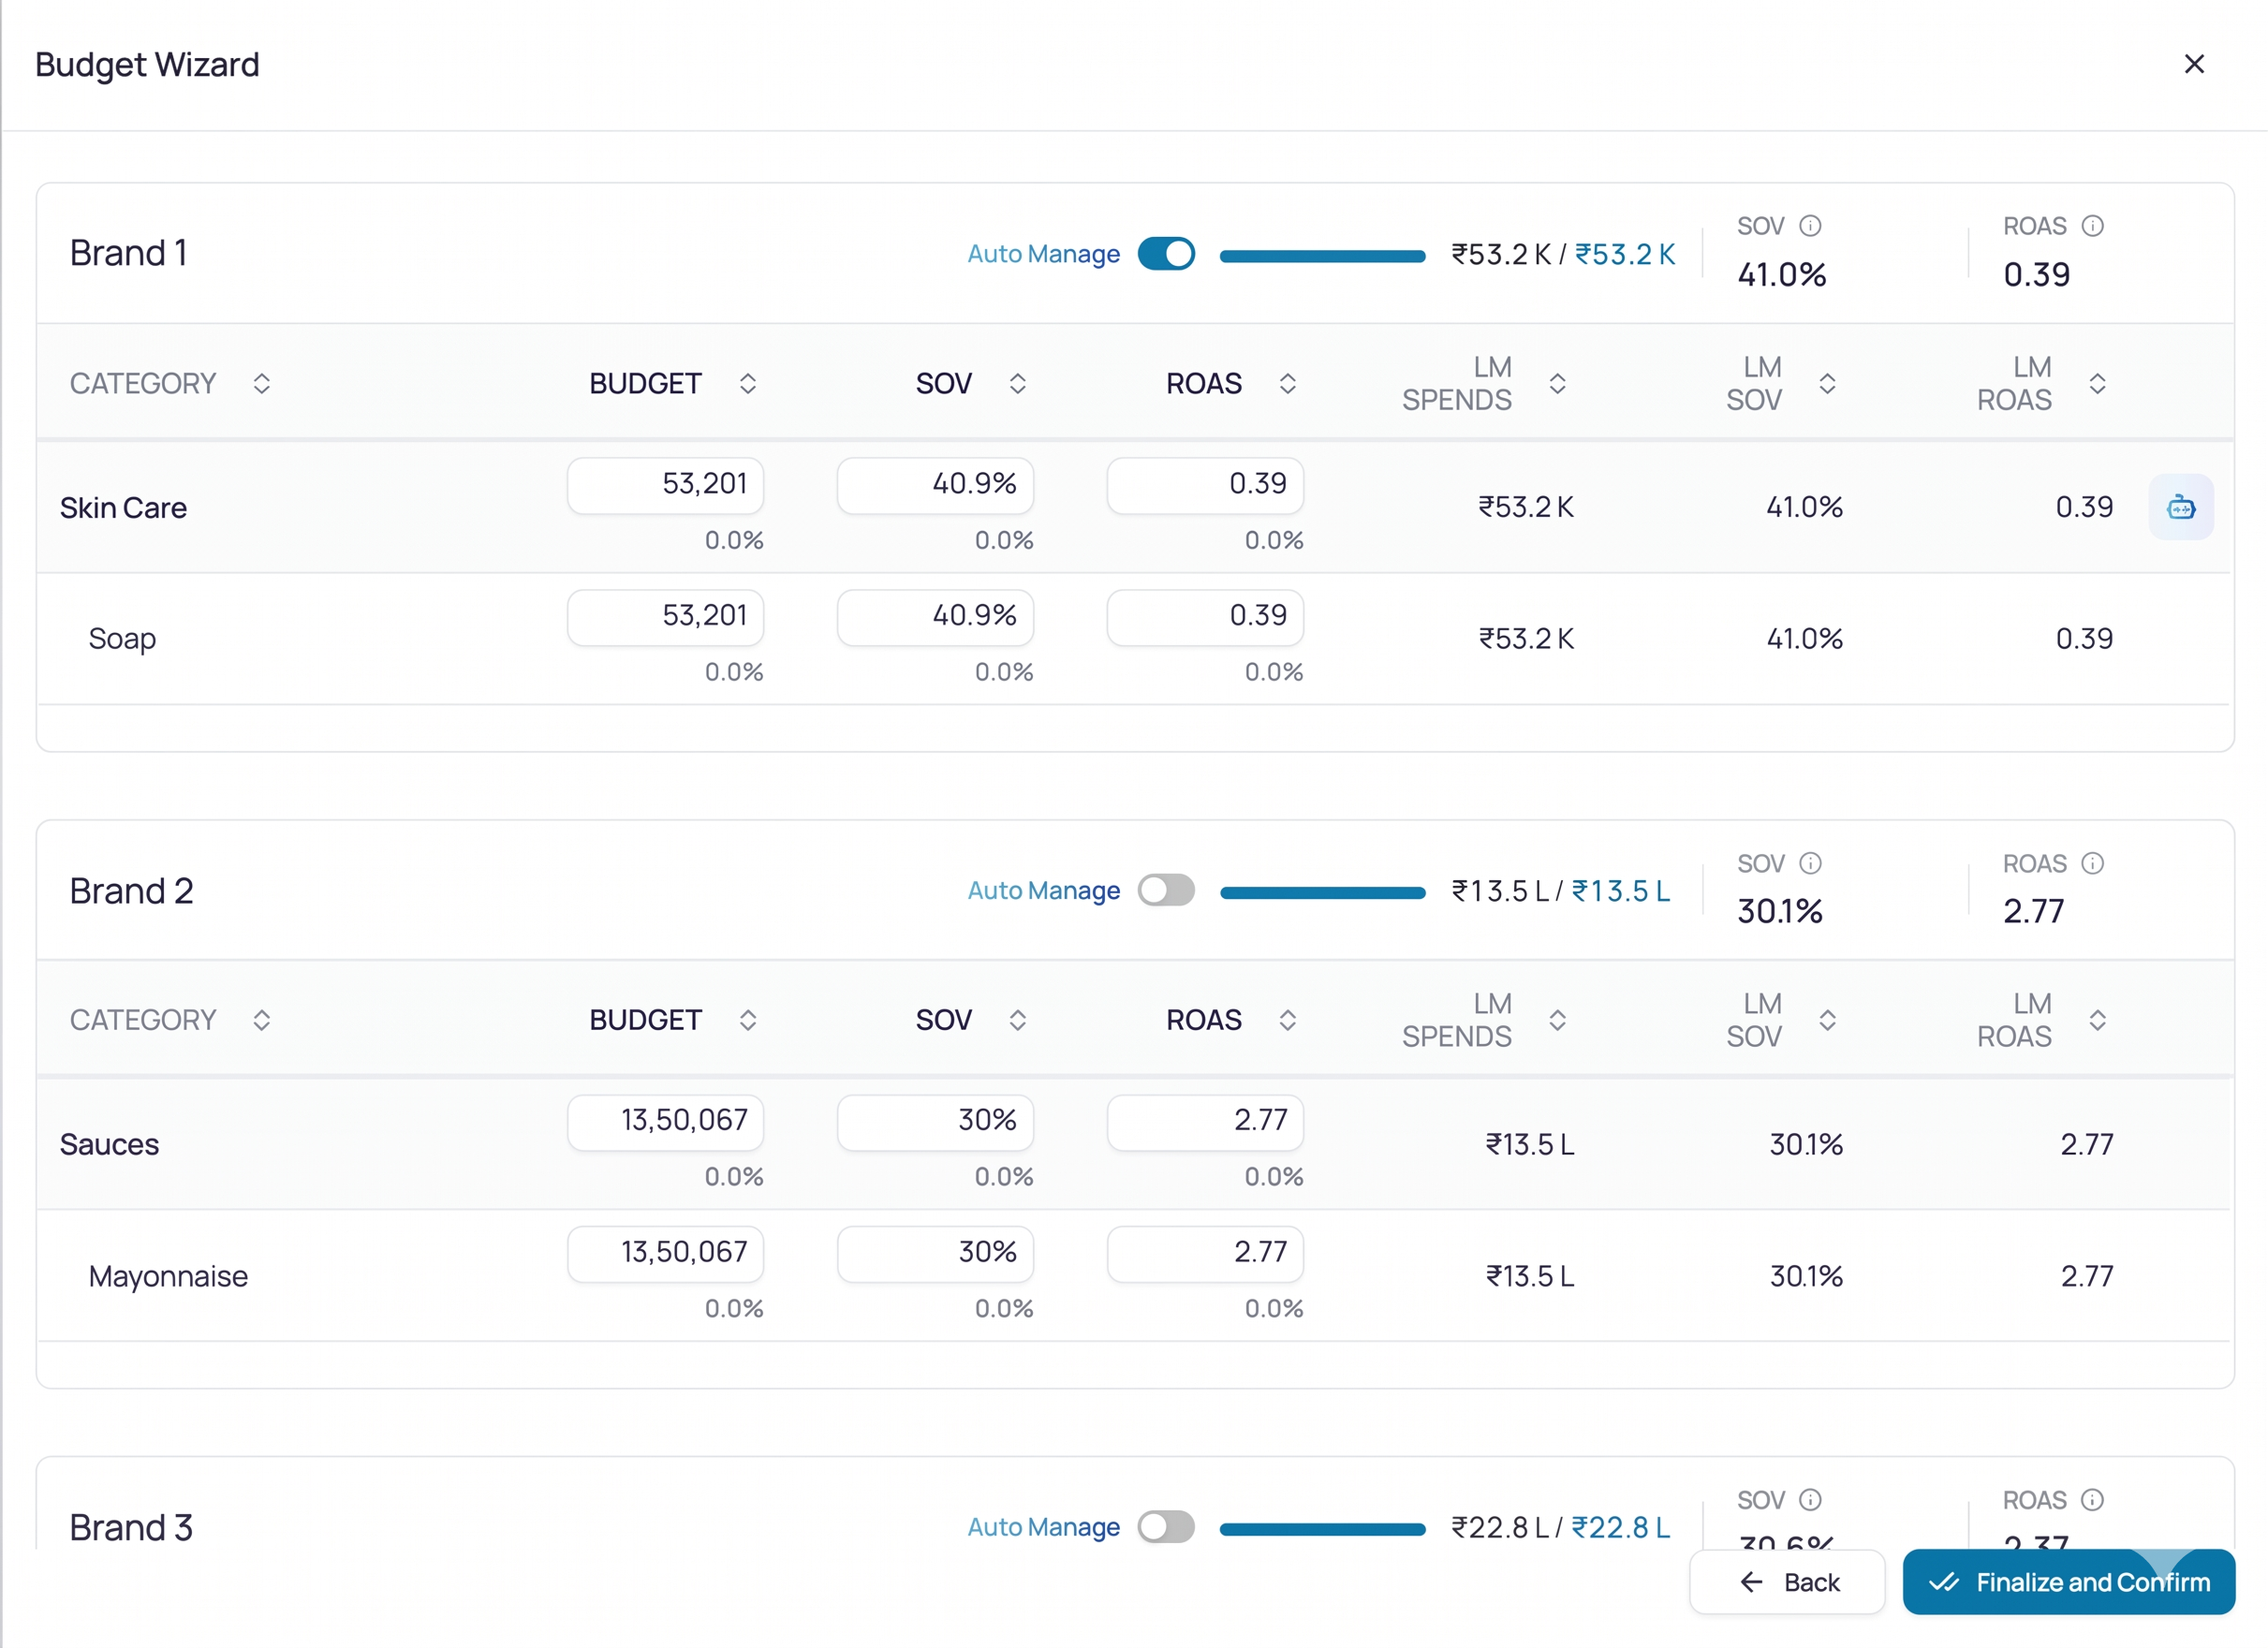
After a plan is confirmed, you can enable Auto Manage on specific brands, categories, or subcategories. Auto Manage is the execution layer for the 1der Recommendations module — turning it on means recommendations generated by 1der for that entity are automatically executed, without manual approval.
Read more about 1der Recommendations here.
🚧 Coming Soon — Auto Manage is currently in beta with a select set of customers. It will be rolled out more broadly in an upcoming release
| Auto Manage ON | 1der recommendations are executed automatically guided by your planned Budget, SOV, and ROAS targets. No manual approval required per recommendation |
|---|---|
| Auto Manage OFF | Recommendations are still generated and visible in the 1der Recommendations module but they wait for your manual approval. Spend follows the plan and pacing rules as configured, |
Mixed control is fully supported — some entities can have Auto Manage enabled while others remain under manual control. You can toggle it on or off selectively at any time.
ℹ️ Auto Manage does not change your planned budget. It controls how recommendations are executed against the plan, not how much is allocated
Monitoring Your Active Plan
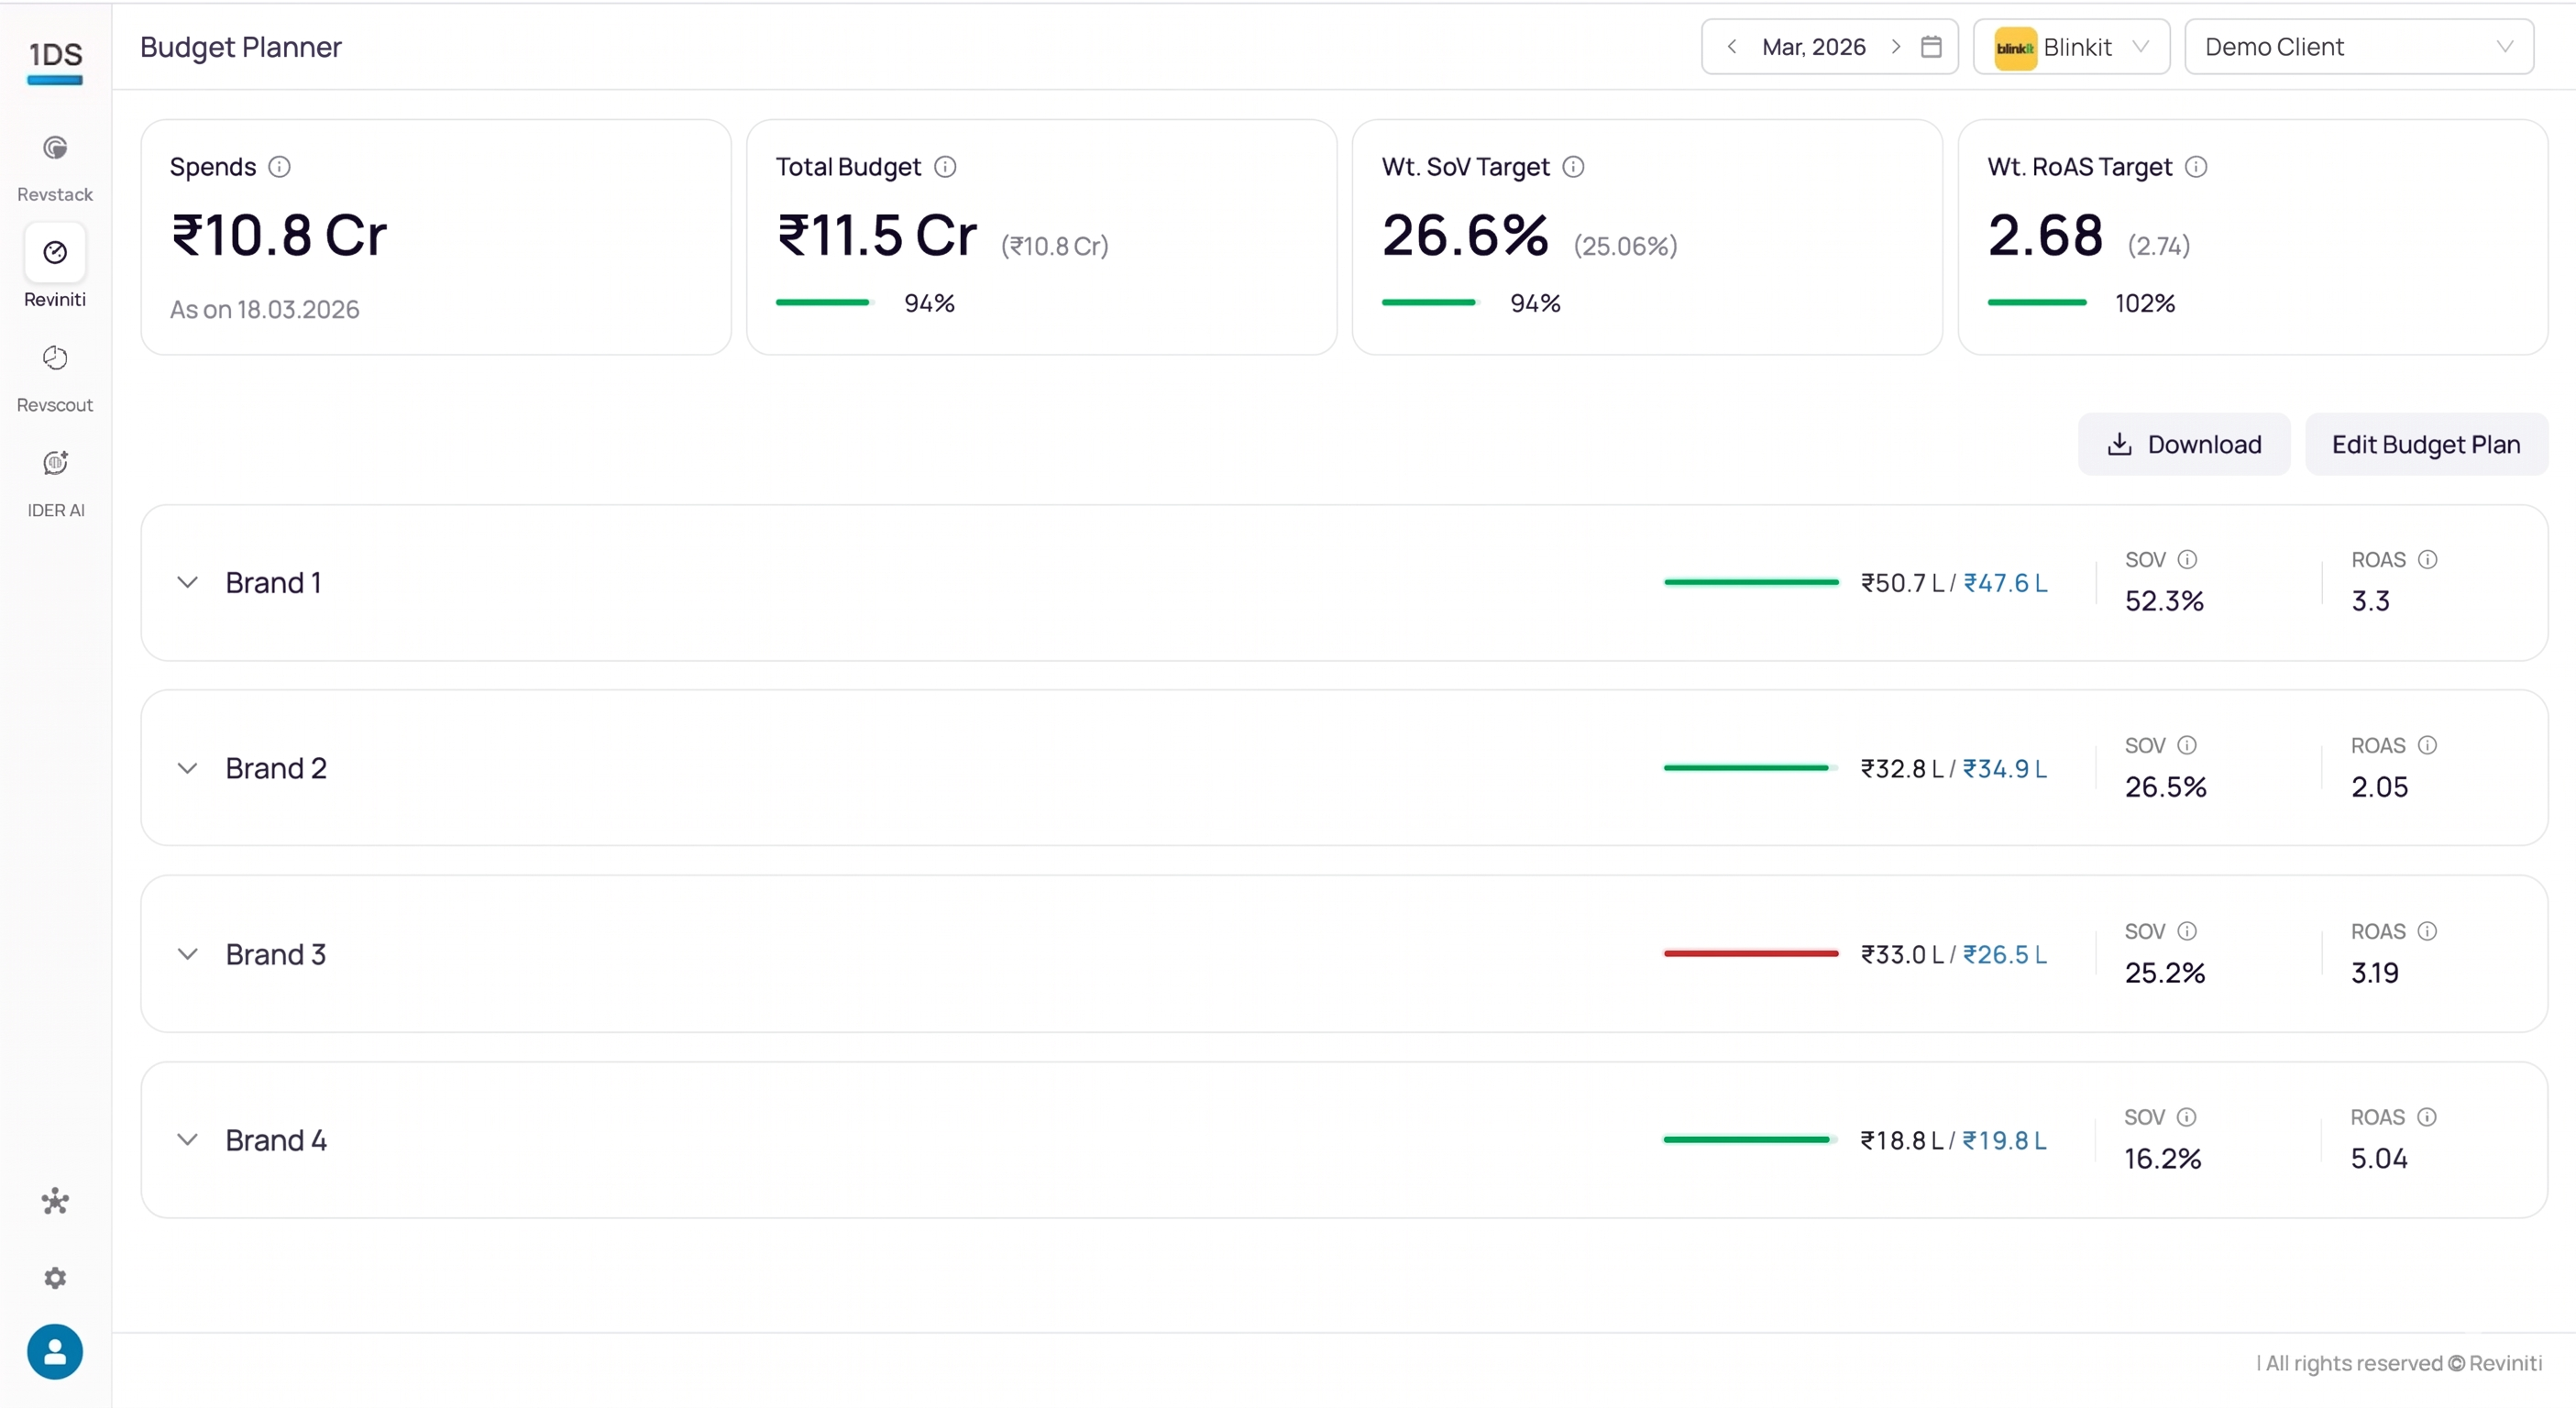
Once the plan is activated, the Budget Planner landing screen switches to a live performance monitor tracking how the plan is pacing in real time.
The monitor includes:
- Budget Pacing — Cumulative Spends vs Ideal Curve - Line chart comparing actual cumulative spend against the ideal pacing curve, with a projected end-of-month value. Annotation shows current day position (e.g., "Day 22 / 30 · 87.8% delivered").
- Budget Allocation vs Spends - Donut or bar chart breaking down planned vs. actual spend across brands
- SOV Target vs Actual - Bar chart per brand comparing planned SOV against delivered SOV to date
- ROAS Target vs Actual - Bar chart per brand comparing planned ROAS against actual ROAS to date
- Brand and category drill downs - Granular view of how each segment is pacing against its plan
Use this view throughout the month to catch spend gaps early and course-correct before month-end.
Filtering and Search
Use the controls on the landing page and monitoring view to focus your view:
- FY and Month - Switch between planning months (past months are read-only; current and future months are editable)
- Auto Manage filter - Show only entities that are (or are not) under automated execution
- Search - Find a specific brand, category, or subcategory in the allocation table
Notes
- Budget planning is always for the current month only — there is no multi-month planning view.
- Budget flows top-down: changes at a parent level do not cascade automatically. Re-apply AutoSet or manually adjust child allocations after editing a parent.
- Last month data is reference only — it does not auto-apply unless you explicitly use AutoSet or Uplift.
- Pacing controls when spend happens, not the total amount. Budget totals are set in Steps 1–3; pacing lives in Steps 4–5.
- Exception rules override Global Default settings for selected entities only. All other entities continue using the global configuration.
- The plan can be edited mid-month — re-opening the wizard, confirming changes, and the performance monitor updates in real time.